Welcome to Workforce! In this exercise, you are the GIS administrator for the city of San Diego. One of your jobs is to support the efforts of the Fire Department by providing geographic data to facilitate its projects, and its upcoming project is inspecting fire hydrants. You have the fire hydrant data it needs to be successful, but you have yet to use Workforce to create a project to manage the work as it is done in the field. You'll create your first Workforce project, and the Fire Department will use it to coordinate its inspections. You'll define the types of work done in the project as well as assign dispatchers and mobile workers their roles. The fire captain of each firehouse dispatches their house's firefighters (the mobile workers). The firefighters inspect and report back on the hydrants.
Note:
For this particular city and its roles and team structures, this alignment of the fire captain as the dispatcher and the firefighters as the mobile workers makes sense: those are the people who fill those roles in hydrant inspections in San Diego. In another city, this may not be the case. For example, in other cities, hydrant inspections are managed and completed by the water department, and different people fill these roles. The key thing to understand here is that there is a relationship between the dispatcher and the mobile worker, and the Workforce project mirrors that relationship: you can configure it as it makes sense for your organization when you create your own project.
If this were a real project you were creating for your company, you'd start by defining it. While this exercise guides you to particular answers about the work it will manage, it's important to understand how to define your own project. See Define a project.
Completing this exercise requires a publisher or administrator role in an ArcGIS organization. Dispatchers and mobile workers only need permission to edit the feature services to work with Workforce.
If you've followed the Manage hydrant inspections Learn lesson, you have already seen most of the material covered in this exercise. However, the Test your project and Next steps sections were not covered there.
Create the Workforce project
As the project owner setting up the Workforce project, you'll work in the Workforce web app.
- Open the ArcGIS Workforce web app. Sign in to your ArcGIS organizational account.
Using ArcGIS Online
Go to https://workforce.arcgis.com.
Using ArcGIS Enterprise
Go to https://host.domain.com/webadaptor/apps/workforce/ (where host, domain, and webadaptor are replaced by information about your portal).
The Projects page appears, showing any projects that you've created or that you participate in as a dispatcher or mobile worker.
- Click Create Project.
You'll be the project owner. Only the project owner can configure the project, including adding assignment types and assigning roles. Once provided with a role in the project, designated users can participate as dispatchers and mobile workers.
Note:
If you don't have sufficient privileges in your organization, you won't see Create Project.
- For your project's name, type Hydrant Inspections.
The name describes the purpose of the project and is how dispatchers and mobile workers find the project. It must be 250 characters or less.
- Type a summary to remind participants of the project's intended purpose: Assign and monitor hydrant inspections in San Diego.
This information is part of the project's details and is visible to people looking at your project's details in the ArcGIS website.
- Click Create project.
During project creation, the project, along with the maps and layers it uses, is created for you. In addition, a folder and a group are created in your ArcGIS organization for this project. You, as the project owner, are also added to the project as a dispatcher so that you can test it. See What is a Workforce project? for details.
Caution:
Although the project, maps, layers, and group are in your portal and can be edited when signed in to ArcGIS in a browser, you need to be careful with the changes you make outside of the Workforce app. If you decide to manipulate these items outside of Workforce, you should avoid these actions:
- Unsharing any of these items with the project's group
- Deleting the project's group
- Deleting or modifying the predefined fields in the layers
- Deleting or modifying the predefined layers
While you can change ownership of the items, do so carefully, making sure to follow all the guidelines in Troubleshooting: How do I move project ownership to another member?
Workforce puts all these components in place for you, so you can use the Workforce project immediately following creation, with minimal configuration.
After the project is created, you see the Assignment Types tab.
Tip:
A Project Setup task list shows at the top of the page to guide you through configuring your project. The task list indicates which step you're on, which step to perform next, and which steps remain before your project is ready for use.
Provide the types of work
On the Assignment Types tab, you'll define the work that is being done in the project. The types should reflect how the dispatchers and mobile workers talk to each other. Generally, the types in a project are items that can be assigned to all or most mobile workers in that project. For this exercise, both fire captains and firefighters refer to their work as hydrant inspections, so you'll use that term for your single type of assignment.
- In the Add an Assignment Type box, type hydrant inspection and click + Type.
Tip:
A project must have at least one assignment type. You can add these after the project is configured, and remove them if unused.
The type is added to your project and appears at the bottom of the tab in the list of assignment types. If you add multiple types, they are sorted alphabetically when you return to the tab and when they are presented to dispatchers.
Provide roles
Add the users who will participate in this project. The roles define where the project can be used: dispatchers use the web app, while mobile workers use the mobile app. For this exercise, the fire captains are the dispatchers and the firefighters are the mobile workers.
- Click the third step in the Project Setup task list: Add Mobile Workers.
The Users tab appears. You, as the project owner, are already added to the project as a dispatcher. This allows you to test the project. To use the Workforce mobile app, you need to be a mobile worker in the project.
- For Organization User, start typing your name to display a filtered list of users in your organization.
The user list contains all the members in your organization with public profiles. If you are an administrator of your organization, you'll also see users with private profiles.
- Click your name.
Because you can't add yourself as a dispatcher again, the Project Role is automatically set to Mobile Worker.
- Click + User.
Another entry appears in the project's user list. This entry lists you as a mobile worker.
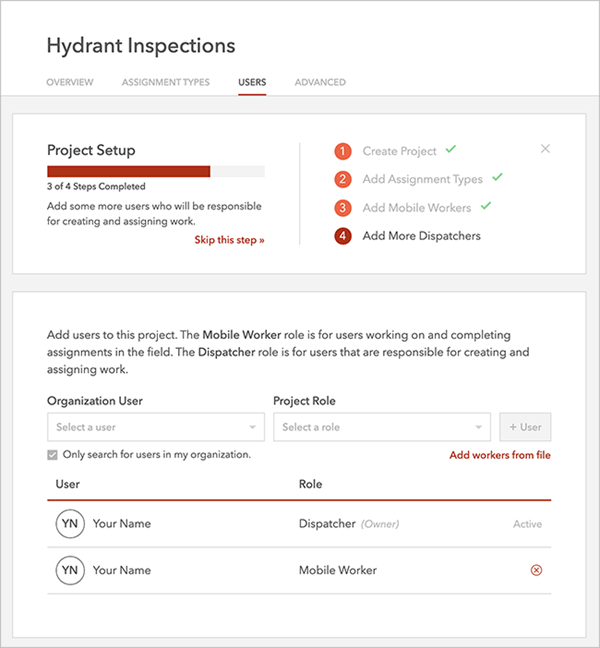
The third step in the Project Setup task list is now complete and the fourth step, Add More Dispatchers, is selected. A project requires at least one dispatcher (which includes your default role as dispatcher) and at least one mobile worker. Because you already have one of each role, you could click Skip this step to complete the project setup. However, you'll further configure the project.
- In the User list, point to your name for the dispatcher role and click Add details.
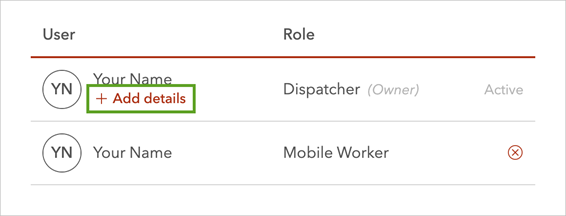
- Provide a contact number and click Save.
- For your mobile worker role, add the following details:
- Contact Number
- Job Title: firefighter
The new details appear in the user list.
- If you need to update the details, hover over the details you added, and click Edit
 . Update the information, and click Save.
 - If you plan to have other users try your project, add those users to the project as dispatchers and mobile workers.
Tip:
You can add any organizational member that has editing privileges. To add users from another organization, see Add users from another organization.
Customize the map
Although your project is now ready to be used, you're going to continue configuring it by customizing the map. While in Workforce, the fire captain and firefighters want to see and search for the hydrants that need inspections. To add the hydrants to the map, you'll need to update the worker's and dispatcher's maps to include another layer.
Tip:
Although in this exercise you add the same layer to both maps, you can add different information to the two maps based on the needs of your dispatchers and mobile workers.
- Click the Overview tab of your project.
- In the Maps list, click Dispatcher map to configure it.
The map opens, allowing you to modify it as you do other maps in your organization. If it's your first time editing a dispatcher map, you're notified that changes will be visible to dispatchers and that you shouldn't remove the Assignments and Workers layers.
- In the notification, click Got It to continue editing the map.
- Click Add and click Search for Layers.
- In the Find box, type hydrants owner:esri_workforce.
- Search in ArcGIS Online by doing one of the following:
- If using ArcGIS Online or ArcGIS Enterprise 10.6.1 or later, change the search from My Content to ArcGIS Online by clicking on My Content and choosing ArcGIS Online.
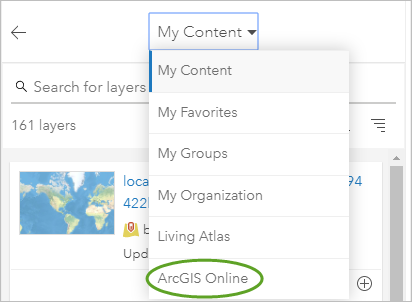
- If using ArcGIS Enterprise 10.6 or earlier, set In to ArcGIS Online and uncheck Within Map Area.
- If using ArcGIS Online or ArcGIS Enterprise 10.6.1 or later, change the search from My Content to ArcGIS Online by clicking on My Content and choosing ArcGIS Online.
- Click Add next to the Fire_Hydrants layer.
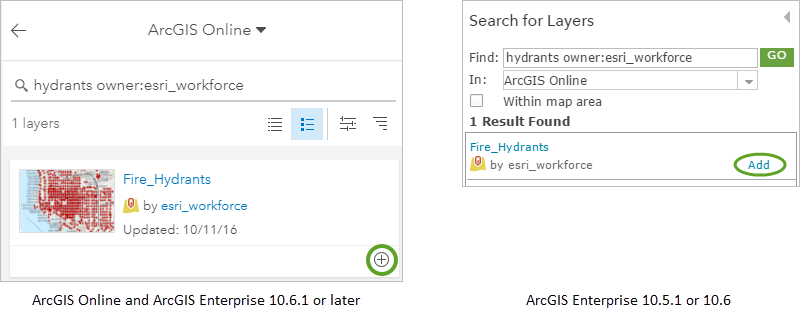
The map extent changes to show the layer you just added. The hydrants are labeled on the map because labels were enabled on that layer. For details, see Tip: Add labels.
- Return to your map's contents.
Using ArcGIS Online or ArcGIS Enterprise 10.6.1 or later
Click the back arrow.
Using ArcGIS Enterprise 10.5.1 or 10.6
Click Done Adding Layers.
The Fire Hydrants layer is added to the top of your map's Contents pane.
- In the Contents pane, point to the Fire Hydrants layer, click the vertical ellipsis, and drag the layer below the Assignments layer to change the layer order.
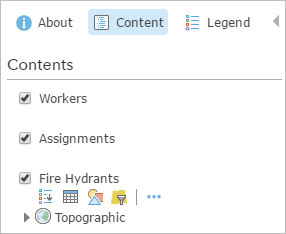
Keeping Workers and Assignments as the first and second layers in the map, with assets below them, will create a map that's better looking and easier to use. Workers will display over the other layers in the map, and assignments will display over the assets.
- In the Contents pane, click the Fire Hydrants layer to show its toolbar, click More Options
 , and click Configure Pop-up.
If you create an assignment from an asset, Workforce uses the pop-up title as the asset description and the location. You'll provide a pop-up title so that the location is useful to mobile workers.
- For Pop-up Title, delete the text, click Add Field Name [+], and choose HYD_ID {HYD_ID}.
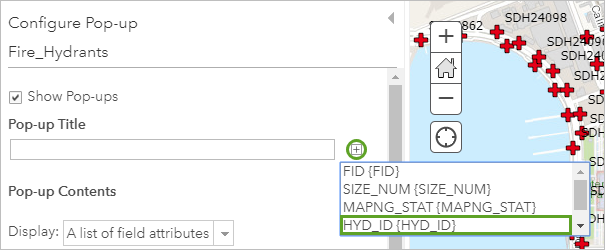
An assignment created for a particular hydrant will show the hydrant ID as its location.
- Click OK to save your pop-up changes.
- Click Save on the toolbar and click Save to save your map changes.
The updates are now visible to the dispatchers.
- In the Contents pane, click About and click More Details to open the map's item page.
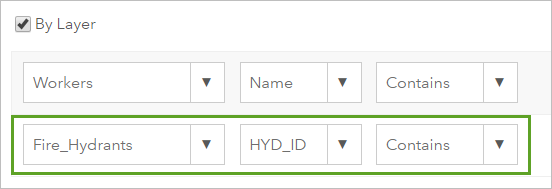
- Click the Settings tab and scroll to the Web Map Settings section. For Find Locations, check the By Layer box.
You want dispatchers to be able to find hydrants on the map by searching for hydrant names. The hydrant name is stored in the HYD_ID field of the Fire Hydrants layer.
- Click Add Layer.
- In the three lists, choose the following layer search settings:
- Fire_Hydrants (the layer to search)
- HYD_ID (the field to query)
- Contains (the search condition)
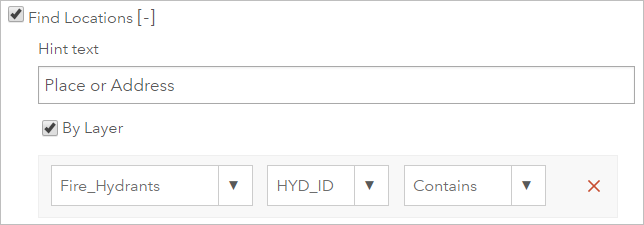
By using Contains as the search condition, dispatchers will be able to search for partial hydrant names.
- Click Save.
- Close the map's item details and, in Workforce, close the map.
- Modify the Worker map in the same way so that mobile workers can see and search for hydrants.
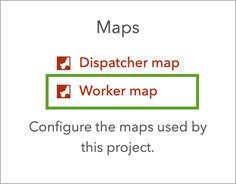
Note:
You won't need to enable By Layer. It's already enabled because searching for workers by name was set up when you created the Workforce project.
Configure additional settings
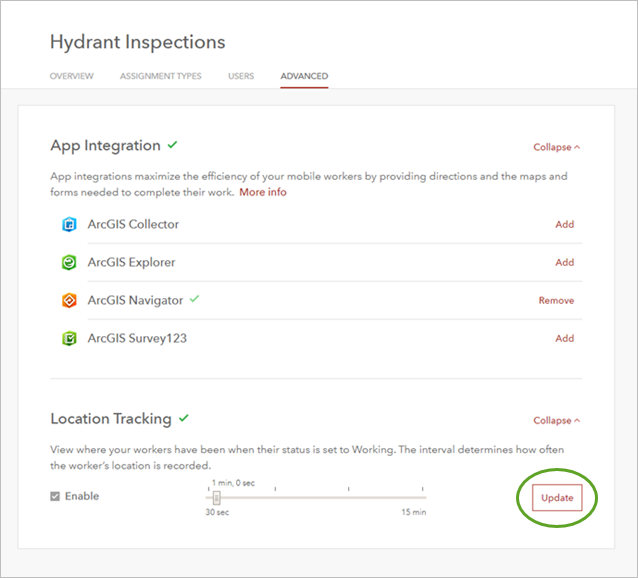
Next, you'll provide a thumbnail for your project, making it easily identifiable by dispatchers and mobile workers. You want to see mobile worker locations updating once a minute, so you'll configure location tracking too. Your mobile workers use ArcGIS Navigator to get to the hydrants they inspect. Integration with ArcGIS Navigator is enabled by default, so you'll just verify that it's enabled.
- On the Overview tab, click the placeholder thumbnail next to About this Project.
- Browse to the thumbnail you want to use, select it, and click Open.
The thumbnail you select should make sense for both dispatchers and mobile workers based on the assignments in the project. Both dispatchers and mobile workers see the thumbnail when browsing to the project to open it. Mobile workers also see it while the project is open.
- Click the Advanced tab of your project.
- Next to App Integration, click Expand to see the apps that mobile workers can use with Workforce.
Navigator integration is enabled by default, whereas Collector, Explorer, and Survey123 integration are not enabled by default and require configuration. Navigator doesn't need configuration because it uses the map that is currently open in Navigator to get directions. Collector and Explorer open the map, and Survey123 opens the survey, that the Workforce project or assignment types are configured to work with.
- Next to Location Tracking, click Expand.
You want to see your mobile workers' locations update every minute.
- Click Enable to track your mobile workers.
Note:
Location tracking and current location, or seeing your mobile workers' locations on the map, are different—location tracking logs the past positions of the mobile workers. You see the current locations of your mobile workers on the map even if you leave location tracking disabled.
- Use the slider to change the location tracking interval from the 30-second default to 1 minute.
The mobile workers' positions will be recorded every minute while they are working.
- Click Update to save your new interval.
Your project is ready for use.
- To open the project for dispatching, click the Overview tab and click Open Project.
If you want to create or use a different project, click the Workforce logo to return to the Projects list.
Test your project
Your project is now configured with the assignments, dispatchers and mobile workers, apps, and other data that empowers your work crew. This exercise should have given you an idea of how Workforce can be used and shown you how to set up a project. If this was a project that you had defined for your organization, your next step would be to test it and verify that it will enable your dispatchers and mobile workers to be successful. Here are a few things you should check to test your project:
- Create example assignments. Make sure the number of assignments created is a good representation of the number of assignments you expect to have active when using the project.
- Go through the full process with some select dispatchers and mobile workers. You'll want to do a complete test with all participants working as they will when the project is in use. This will let you confirm that your project is structured correctly and answer the following questions: Do the types of assignments resonate with both dispatchers and mobile workers? Are the right mobile workers and dispatchers defined?
- If your project has types of work that are only done by a few mobile workers or a single mobile worker, make sure these types of work are appropriate in your workflow. While in some scenarios they may be, in others it may be confusing to have these types of work in a project.
- Verify that your app integrations are working as expected.
Tip:
If you find issues, edit your project and retest it. To edit a project, go to My Projects, hover over the project, and click Configure  . You'll only see the options to configure and delete projects you own.
With Workforce, your dispatchers and mobile workers now have a common view in the back office and in the field, and they have an easier time staying organized and reporting progress while in the field. You'll see overhead decrease and productivity rise as you move more projects into Workforce.
Next steps
Now that you have created your first Workforce project, you are ready to think about your own projects and how Workforce can be incorporated into your organization. Perhaps you are going to manage work similar to this exercise, where each assignment maps to a single feature. Perhaps, instead, you are going to create an assignment for each area where work needs to be done, such as having an assignment for each park where your mobile workers need to collect data about each tree, and multiple features will result from the work that is done. Perhaps you are going to have assignments that need to be managed independent of any association to a feature. Whatever the work you are managing, the following are some tips to bring Workforce into your organization:
- Start small—Choose a project that isn't mission critical, has a manageable number of assignment types, and spans a finite amount of time.
- Choose your crew wisely—Some members are more open to change than others. For your test run of Workforce, select a crew that is open to new processes and technology so that after their experience, they can advocate for its adoption with you.
- Run in tandem—For your first project, run the app with your existing workflows. That way, if necessary, you can stop using Workforce and switch back to your existing workflows.
If you aren't ready to start your own project yet, continue with Create your first assignment to see how dispatchers use Workforce to create assignments.