Welcome to Workforce! In this exercise, you are a fire captain with the San Diego Fire Department. One of your jobs is to manage hydrant inspections by creating assignments for the work and assigning them to firefighters to complete. The city of San Diego's GIS administrator created a Workforce project for you to use to manage the inspections, but you have yet to use it to assign and monitor the inspections as your firefighters work in the field. You are ready to start the inspection project, so you need to create assignments for that work so that it can be completed by your mobile workers, the firefighters.
Note:
For this particular city and its roles and team structures, this alignment of the fire captain as the dispatcher and the firefighters as the mobile workers makes sense: those are the people who fill those roles in hydrant inspections in San Diego. In another city, this may not be the case. For example, in other cities, hydrant inspections are managed and completed by the water department, and different people fill these roles. The key thing to understand here is that there is a relationship between the dispatcher and the mobile worker, and the Workforce project mirrors that relationship: you can configure it as it makes sense for your organization when you create your own project.
To complete this exercise, you must be a dispatcher in the Workforce project. Contact your project owner if you can't open the project.
If you've followed the Manage hydrant inspections Learn lesson, you have already seen most of the material covered in this exercise. However, the sections Review your added assignments and Next steps were not covered there.
Open the Workforce project
The city's GIS administrator already created the Workforce project for hydrant inspections and shared it with you. You'll open that project to add the new assignments.
Note:
If you are following these exercises to explore Workforce, first complete the workflow in Create your first project. Then return here to use that project.
- Open the ArcGIS Workforce web app. Sign in to your ArcGIS organizational account.
Using ArcGIS Online
Go to https://workforce.arcgis.com.
Using ArcGIS Enterprise
Go to https://host.domain.com/webadaptor/apps/workforce/ (where host, domain, and webadaptor are replaced by information about your portal).
The Projects page appears, showing any projects that you've created or that you participate in as a dispatcher or mobile worker.
- Open the Hydrant Inspections project.
You see all the current assignments and mobile workers. You see them both on the map and in the lists to the left of the map. If the project was just created, your map and assignments list are empty, but the workers list contains the mobile workers who were added to the project.
Note:
Mobile workers appear on the map once they have signed in and have a location. They are available in the workers list once they are added to the project.
Create assignments
First you'll create an assignment for hydrant SDH24758, which is outside the San Diego Convention Center and needs to be inspected. You'll assign the assignment to the firefighter who will perform the inspection. This assignment isn't critical work. It's a medium-priority routine inspection that needs to be completed by next Wednesday. As you create the assignment, picture the paper work assignments used today. The pieces of information on those are the pieces that belong here.
- Click Search
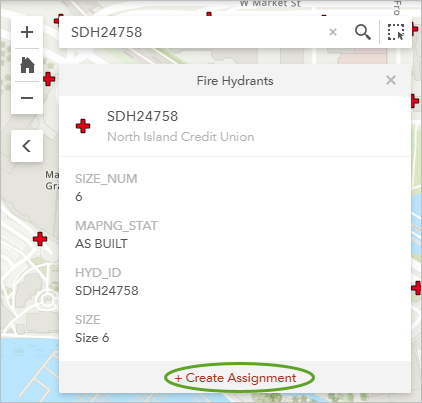
 on the map to show the search box, type SDH24758, and press Enter.
The map centers on the hydrant with the matching hydrant ID. The hydrant's details appear below the search box.
Tip:
If the panel covers too much of the map, click Collapse side panel
 to hide it.
 - At the bottom of the hydrant's details, click + Create Assignment.

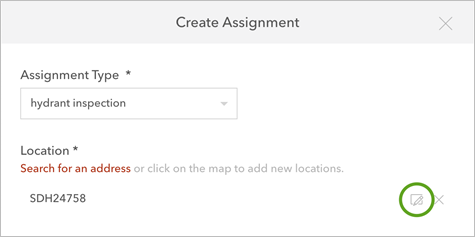
The Create Assignment pane appears. The Location of the assignment is already set to the location of the hydrant and to display the hydrant's ID. The ID is displayed because that is the pop-up title you configured for the dispatcher's map when you created the Workforce project.
Tip:
You don't have to create assignments based on features. You can also use the + Assignments button at the top of the assignments list and click the map to provide the address, or you can do a search and create an assignment based on a result's location.
- For Assignment Type, choose hydrant inspection.
You could start typing to filter the list; however, with only one type in this project, it is easy to select it from the full list.
Your location is already populated with the hydrant's location. You'd like to provide some more meaningful information about the hydrant location.
- Point to the hydrant's ID where it shows under Location and click Edit
 .
.
- Type - outside entrance B after the hydrant's ID and click Update.
This gives your inspector a better idea of where to look for the hydrant.
An assignment type and a location are all that is required when creating assignments. However, you know a bit more for this assignment, so you'll continue providing information.
- Under Assigned to, click Assign and select the firefighter that will do the inspection.
For this exercise, you can assign the work to any mobile worker in your project. Depending on the mobile workers you added as you created the project, that could be yourself.
You won't always know who will be assigned the work, and that is okay. You can leave assignments unassigned until you know who will handle them.
- For Priority, choose Medium.
Tip:
The mobile workers are notified when work is assigned to them. If you have work that is critical, upon receiving notification of it, the mobile worker is prompted to acknowledge the work, and you're notified that they have seen it. If they don't acknowledge it quickly enough, you can reassign the assignment to another mobile worker.
- Click in the Due Date box to show the date picker, and click next Wednesday's date. There is no due time, so you'll skip that setting.
The ID field lets you tie your assignment to a work order that is coming from a work order management system. For this exercise, you don't have such a system, so you'll leave it blank.
The Description box is where you enter all the information the mobile worker needs to know to complete their assignment. You can include references to specific assets and information about the specific location. For example, you can indicate if there is a dog to be aware of or if you need to notify the homeowner before you start work. In this case, the assignment is for a routine inspection, so no additional description is needed.
Note:
Descriptions are limited to 4,000 characters.
If you need to provide more information than the 4,000 allowable characters, or if you have the information already available to share with the mobile worker (either a report or even a complete binder of information), you can attach files to the assignment. There are maximum size limits for attached files. If you're using ArcGIS Online, the maximum size for each file is 10 MB. If you're using ArcGIS Enterprise, the default maximum file size for each file is 2 GB, but it can be configured by your administrator. For this inspection, there are no files to share.
- Click Create Assignment to create the assignment, assign it to the mobile worker specified, and notify the mobile worker on their mobile device.

Review your added assignments
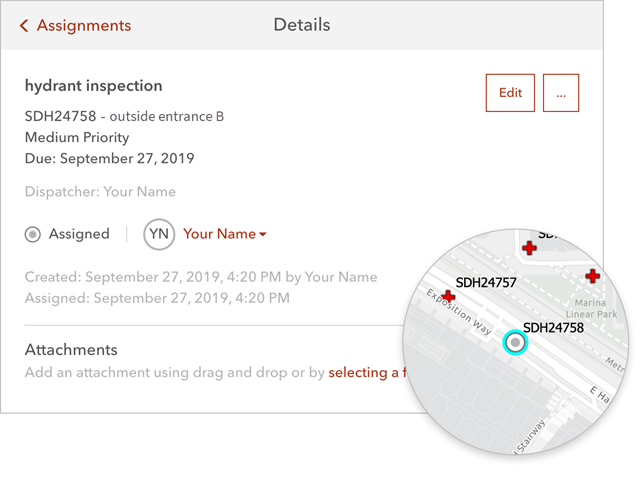
The assignments you added are now in the assignments list shown in the web app. When mobile workers start assignments, you'll see the statuses change as the assignments progress toward completion. If you want to see more information about an assignment, or if you notice a mistake in an assignment, click its type to view its details and center the map on that assignment. In the details, you can also edit the assignment, as long as the work isn't in progress. If a mobile worker adds a note to an assignment, a note icon  displays for the assignment in the list, and viewing the assignment's details also shows the note. Attachments added by you, another dispatcher, or a mobile worker are also included in the details of an assignment.
A dispatcher can reassign an assignment, clear the assigned mobile worker, or cancel assignments at any point until the mobile worker starts the work (that is, as long as the assignment doesn't have the status In Progress). Once a mobile worker starts the assignment, the mobile worker is in control of the assignment since they are in the midst of completing that work. If not actively worked on (for example, if the status is Assigned, Unassigned, Paused, or Canceled), the dispatcher controls the assignment. When mobile workers are added to assignments, removed from them, or have work canceled, they are notified, and their To Do list updates.
Tip:
While you are editing an assignment, you can also edit its location. To do so, click the map or use a new search result. You can also edit the text for the location field, which doesn't affect the assignment's location on the map.
Next steps
Now that you are familiar with the basics of creating an assignment, try creating a few on your own. Here are some things to try:
- Create an assignment at a location selected on the map—After clicking + Assignments, click the location on the map where you want to add the assignment. Then provide the rest of the details as you did previously.
- Edit a set of assignments—Select a set of assignments on the map and reassign them, or change their priorities or due dates.
- Review the tips about assignment creation.
You can also continue with Assign your first assignment to see how dispatchers use Workforce to assign and reassign existing assignments.